
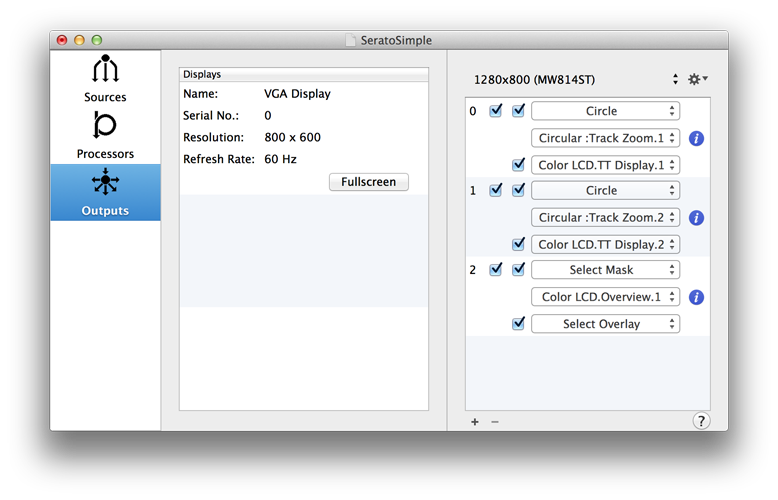
The outputs screen controls the final projection mapping. An external display is expected, if one is not present, a warning will appear on startup. The external displays should not be mirrored. Displays are expected to be connected via traditional video inputs, Display port, Thunderbolt or HDMI. Displays that connect via USB may not be detected.
The main table shows available displays with details. The table on the right controls layers. Layer definitions are required and can be configured from the action button in the top right.
To create layer definitions, select desired external display and set it to full screen. Create a definition using the action button in the top right.
Layers can be added or removed using the “+” or “-” buttons from the bottom of the layers Table.
Each layer can have a two processors attached, one of the processors is an optional overlay, and will render directly over the main processor for the layer, so an overlays should use alpha.
Each layer can have a mask set, only a circle mask is available currently.
Layer orders can be changed by dragging and dropping the table entries.
Mapping
Once a layer definition and layers have been created, selected layers can be edited in the full screen display area.
Each layer has four control points, one for each corner. Only one node can be edited at a time, nodes can be selected using the “q”, “w”, “a” and “s” hot keys. The nodes can also be cycled using “,” and “.” hot keys. Nodes are positioned by simply clicking where you want the current node to be. Fine per pixel adjustment can be done with the arrow keys. Dragging quad corners has no effect.
Layers can also be changed using “o” and “p” hot keys to move through layers.